
Good Evening fair members of the populace!
One of the goals of the Officer of the Chronicler is to help record and spread the good word of the Barony most often times taking the form of the Newsletter. I want to take that a step further and empower you all to share information that pertains to each of our other offices, events and the general good works and projects that you all are working on at any given moment. We should celebrate the accomplishments of our skilled and artful populace both in the workshops of our Barony and on the fields of battle, tournament lists and archery ranges.
To this end, I have authored this article to help you familiarize yourself with how to publish articles of your own design and push them to the far reaches of the Barony and beyond. Additionally, it also enables the Chronicler to scoop up your contributions and push them further through the monthly Newsletter and other social media platforms all with the single click of a button. Much of this is automated and will propagate throughout Facebook, Twitter, Discord, Pinterest and Google Plus giving you maximum exposure for your news, articles and other content.
The first option is to simply send the Chronicler an article in text format and include any images you may want to include to Chronicler[at]SouthernPass[dot]org (@ and . spelled out for anti-spam purposes). There are no deadlines, so please send whatever you have whenever you find the time to write up an article. If you are concerned about a timeline, please send it before the end of the month to ensure it gets included in that month’s Newsletter.
The second option, if you are internet savvy and wish to have a little more control over how and when articles are posted (or you want to reduce the workload on your friendly, local Chronicler!), involves obtaining an account for the website by contacting the Webminister or the Chronicler to have them create an account for you. Once you have an account you can log in by going to the bottom of the website on any page and clicking the “Log In” link, which will take you to the website’s Dashboard. On the left hand side you will see a menu with several options that may change depending on your level of permissions. What you’re looking for, for the purposes of this article, is the Posts portion. There should be a menu that expands when you hover over Posts, but if you click on it, the link will also take you to a page with a list of all the recent Posts and an Add New link near the top. The hover menu will also reveal an Add New option. Once you’ve clicked on the Add New option you will be presented with a text editor. Make sure you use the Visual tab unless you’re WordPress savvy and want to venture into the world of advanced editing options. We’ve included several plugins that enable a Page Builder that will let you do way more formatting tricks than any single person needs.
Once you’ve set up your article how you want it, we highly recommend you add an image to the top of the article by clicking “Add Media” and either the same or a different image as the Featured Image by scrolling all the way down on the right side to the Featured Image section clicking on “Set Featured Image.”
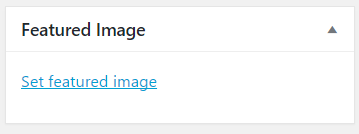
The Featured Image section is on the far right side of the page reached by scrolling all the way to the bottom.
Additionally, you should select a Category for the article as this will control where it gets displayed. If you are adding news as an officer, please select Officer News and the appropriate officer news sub-category to ensure it shows up next to your officer section on the Court and Officers Page. Featured articles will be added to the rotating slider on top of the main website and Homepage will display in the articles section below that. We recommend you select the Homepage Category at a minimum and use the Featured Category sparingly as it bumps other articles off after a certain number is reached. The Resources Category is meant for guides and other how-to articles that will be put into rotation on the Resources Page under the Resources Tab on the website.

Look for the Category section on the right side of the page
Now that you’ve got your body text, images and categories settled, you’re ready to add some Tags. Tags are optional, but they make your article discoverable by the wider internet through Google and other search engines. Tags are completely open ended and you can add whatever you want to the box and as many as you want. Tags should be single words or short phrases that act as keywords to help people find your article.
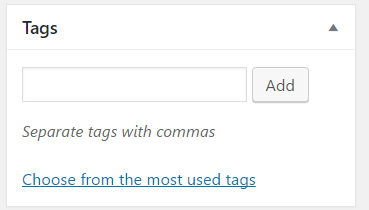
The Tags section is located just under the Category section.
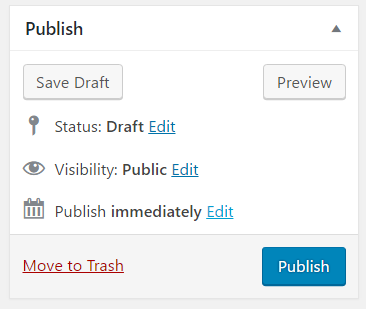
After all that, we’re ready to publish! There are two options here. You can either take the plunge and publish immediately or schedule the article. There’s also a third option (more like a second to the original two?) where you can leave it in draft form and send the Chronicler a message to quality check your work, which we ultimately recommend. Please send the Chronicler a message though, so we can make sure your Post doesn’t get left behind.
Click “Edit” next to Publish immediately to schedule the Post for the future if you don’t want to publish it right away.